How to implement Insert Update Delete functionality in Single View?


EntryScreen

So many People like to do Insert/Update/Delete in single View i.e. similar to asp.net. But asp.net MVC default it does not support this approach. We can achieve this functionality like this

Step 1:
Create the blank application like this

InitialPage

Empty

Step 2: Create the database table like this

Database

Step 3: In model layer, create the model using EF database first approach like this

EmpModel

Step 4: Now create a blank Emp controller like this

EmpController

Step 5: Add a class i.e HttpParamActionAttribute in solution like this

using System;
using System.Collections.Generic;
using System.Linq;
using System.Reflection;
using System.Web;
using System.Web.Mvc;
 
namespace EmpDemoInMVC
{
    public class HttpParamActionAttribute : ActionNameSelectorAttribute
    {
        public override bool IsValidName(ControllerContext controllerContext, string actionName, MethodInfo methodInfo)
        {
            if (actionName.Equals(methodInfo.Name, StringComparison.InvariantCultureIgnoreCase))
                return true;
 
            var request = controllerContext.RequestContext.HttpContext.Request;
            return request[methodInfo.Name] != null;
        }
    }
}

Note: We are writing this class to fire the multiple Submit button events from single view.

Step 6: Write the Action Method in Controller for Insert/Update/Delete and fetch functionalities like this


using System;
using System.Collections.Generic;
using System.Linq;
using System.Web;
using System.Web.Mvc;
using EmpDemoInMVC.Models;
using System.Data.Entity;
 
namespace EmpDemoInMVC.Controllers
{
    public class EmpController : Controller
    {
 
        EmpEntities db = new EmpEntities();
        
        //
        // GET: /Emp/
        public ActionResult Index(int? id)
        {
            ViewBag.Operation = id;
            ViewBag.Name = db.tblEmps.ToList();
            tblEmp objEmp = db.tblEmps.Find(id);
            return View(objEmp);
        }
 
        [HttpPost]
        [HttpParamAction]
        [ValidateAntiForgeryToken]
        public ActionResult Create(tblEmp objEmp) 
        {
            if (ModelState.IsValid)
            {
                db.tblEmps.Add(objEmp);
                db.SaveChanges();
            }
            return RedirectToAction("Index");
        }
 
        [HttpPost]
        [HttpParamAction]
        [ValidateAntiForgeryToken]
        public ActionResult Update(tblEmp objEmp)
        {
            if (ModelState.IsValid)
            {
                db.Entry(objEmp).State = EntityState.Modified;
                db.SaveChanges();
            }
            return RedirectToAction("Index", new { id = 0 });
        }
 
        public ActionResult Delete(int id)
        {
            tblEmp objEmp = db.tblEmps.Find(id);
            db.tblEmps.Remove(objEmp);
            db.SaveChanges();
            return RedirectToAction("Index", new { id = 0 });
        }
	}
}

Step 7: Create the Empty View from controller like this

View

Step 8: Now write the html code as per as our requirement like this

@model EmpDemoInMVC.Models.tblEmp
 
@{
    ViewBag.Title = "Index";
}
 
<h2>Index</h2>
 
@using (Html.BeginForm()) 
{
    // This is For EmpDetail in Grid
        <fieldset>
            <legend><b>Emp Details</b></legend>
            <table border="1" cellpadding="10">
                <tr>
                    <th>
                        @Html.DisplayNameFor(model => model.Name)
                    </th>
                    <th>
                        @Html.DisplayNameFor(model => model.Address)
                    </th>
                    <th>
                        @Html.DisplayNameFor(model => model.EmailId)
                    </th>
                    <th>
                        @Html.DisplayNameFor(model => model.MobileNo)
                    </th>
                    <th>
                        @Html.DisplayNameFor(model => model.Country)
                    </th>
                    <th>
                        Action
                    </th>
                </tr>
 
                @foreach (var item in (IEnumerable<EmpDemoInMVC.Models.tblEmp>)ViewBag.Name)
                {
                    <tr>
                        <td>
                            @Html.DisplayFor(modelItem => item.Name)
                        </td>
                        <td>
                            @Html.DisplayFor(modelItem => item.Address)
                        </td>
                        <td>
                            @Html.DisplayFor(modelItem => item.EmailId)
                        </td>
                        <td>
                            @Html.DisplayFor(modelItem => item.MobileNo)
                        </td>
                        <td>
                            @Html.DisplayFor(modelItem => item.Country)
                        </td>
                        <td>
                            @Html.ActionLink("Edit", "Index", new { id = item.Id }) |
                             @Html.ActionLink("Delete", "Delete",new { id = item.Id },new { onclick = "return confirm('Are you sure you wish to delete this article?');" })
                        </td>
                    </tr>
                }
 
            </table>
      </fieldset>
    
    // This is for the Emp Entry Screen
    @Html.AntiForgeryToken()
    <div class="form-horizontal">
       
        @Html.ValidationSummary(true)
 
        <fieldset>
            <legend> <b>Entry Screen</b></legend>
 
            <div class="form-group">
                @Html.LabelFor(model => model.Name, new { @class = "control-label col-md-2" })
                <div class="col-md-10">
                    @Html.EditorFor(model => model.Name)
                    @Html.ValidationMessageFor(model => model.Name)
                </div>
            </div>
 
            <div class="form-group">
                @Html.LabelFor(model => model.Address, new { @class = "control-label col-md-2" })
                <div class="col-md-10">
                    @Html.EditorFor(model => model.Address)
                    @Html.ValidationMessageFor(model => model.Address)
                </div>
            </div>
 
            <div class="form-group">
                @Html.LabelFor(model => model.EmailId, new { @class = "control-label col-md-2" })
                <div class="col-md-10">
                    @Html.EditorFor(model => model.EmailId)
                    @Html.ValidationMessageFor(model => model.EmailId)
                </div>
            </div>
 
            <div class="form-group">
                @Html.LabelFor(model => model.MobileNo, new { @class = "control-label col-md-2" })
                <div class="col-md-10">
                    @Html.EditorFor(model => model.MobileNo)
                    @Html.ValidationMessageFor(model => model.MobileNo)
                </div>
            </div>
 
            <div class="form-group">
                @Html.LabelFor(model => model.Country, new { @class = "control-label col-md-2" })
                <div class="col-md-10">
                    @Html.EditorFor(model => model.Country)
                    @Html.ValidationMessageFor(model => model.Country)
                </div>
            </div>
            <div class="form-group">
                <p>
                    <input type="submit" value="Create" name="Create"
                           style=@((ViewBag.Operation != null && Convert.ToInt32(ViewBag.Operation) > 0) ? "display:none" : "display:block") />
                    <input type="submit" value="Update" name="Update"
                           style=@((ViewBag.Operation != null && Convert.ToInt32(ViewBag.Operation) > 0) ? "display:block" : "display:none") />
                </p>
            </div>
            </fieldset>
 
</div>
}
 

Summary:

In this article we show that we are using only one view for doing Insert/Update/Delete and Fetch function. If you like to implement entry screen similar to asp.net style you can use this approach.

How to implement Multiple submit button in single View of asp.net MVC?


Index

Save

We can do this task in so many ways. But one of simple approach to do this using “attribute-based solution”
To achieve this task we can do like this

Step 1: Create one class i.e HttpParamActionAttribute.cs in asp.net MVC application.


using System;
using System.Reflection;
using System.Web.Mvc;
 
namespace MultipleButtonClick
{
    public class HttpParamActionAttribute : ActionNameSelectorAttribute
    {
        public override bool IsValidName(ControllerContext controllerContext, string actionName, MethodInfo methodInfo)
        {
            if (actionName.Equals(methodInfo.Name, StringComparison.InvariantCultureIgnoreCase))
                return true;
 
            var request = controllerContext.RequestContext.HttpContext.Request;
            return request[methodInfo.Name] != null;
        }
    }
}

Step 2: Create a Home control and write some action like this

using System.Web.Mvc;
 
namespace MultipleButtonClick.Controllers
{
    public class HomeController : Controller
    {
        //
        // GET: /Home/
 
        public ActionResult Index()
        {
            ViewBag.msg = "I am from Index action.";
            return View();
        }
 
        [HttpPost]
        [HttpParamAction]
        public ActionResult Save()
        {
            ViewBag.msg = "I am from Save action.";
            return View();
        }
 
        [HttpPost]
        [HttpParamAction]
        public ActionResult Delete()
        {
            ViewBag.msg = "I am from Delete action.";
            return View();
        }
    }
}

Step 3:Create one View I.e Index write the html code like this


@{
    ViewBag.Title = "Index";
}
 
<h2>Index</h2>
 
@ViewBag.msg
 
<br /> <br />
@using (@Html.BeginForm())
{
 
    <input type="submit" name="Save" value="Save" />
 
    <input type="submit" name="Delete" value="Delete" />
}

How to create Razor function in asp.net MVC View?


Function

Razor function is exactly similar to C#/vb.net methods/Function. These features came asp.net MVC 3.0 onward. Here we can write the frequently used functionality inside the function.
Here I will show how to use in Razor function in view

We have to give function syntax like this

@functions
{
// Here will be C# method
}

For calling the function Just give @MethodName

FunctionInRazor

Note: I hope you are aware of creating view in asp.net MVC.

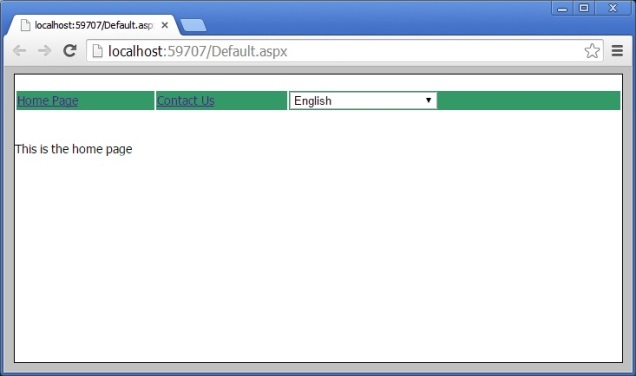
How to create the Multilanguage application in asp.net?


English

Swedish

We can create the Multilanguage application in asp.net like this

Step 1: Add the Master Page Site1.Master and Design the Menu and language Selection dropdown list like this

<%@ Master Language="C#" AutoEventWireup="true" CodeBehind="Site1.master.cs" Inherits="MultilanguageSample.Site1" %>

<!DOCTYPE html>

<html xmlns="http://www.w3.org/1999/xhtml">
<head runat="server">
    <title></title>
    <style type="text/css">
        html {
            font-family: Tahoma;
            font-size: 14px;
            font-style: normal;
            background-color: Silver;
        }

        .Content {
            margin: auto;
            width: 700px;
            background-color: white;
            border: Solid 1px black;
        }
        .auto-style1 {
            width: 100%;
        }
    </style>
    <asp:ContentPlaceHolder ID="head" runat="server">
    </asp:ContentPlaceHolder>
</head>

<body>
    <form id="form1" runat="server">
        <div class="Content">
        <br />
            <table class="auto-style1">
                <tr>
                    <td style="background-color: #339966"> <a href="Default.aspx">
                <asp:Label ID="Label1" meta:resourcekey="menuItemDefault" runat="server" Text="Home"></asp:Label>
            </a></td>
                    <td style="background-color: #339966; " ><a href="Contact.aspx">
            <asp:Label ID="Label2" meta:resourcekey="menuItemContact" runat="server" Text="ContactUs"></asp:Label>
        </a></td>
                    <td style="background-color: #339966;"><asp:DropDownList ID="DropDownList_Language" runat="server" Height="20px" Width="170px"
            OnSelectedIndexChanged="DropDownList_Language_SelectedIndexChanged" AutoPostBack="true">
            <asp:ListItem Value="en-US">English</asp:ListItem>
            <asp:ListItem Value="sv-SE">Swedish</asp:ListItem>
        </asp:DropDownList></td>
                </tr>
            </table>
        <br />
        <br />

        <div>
            <asp:ContentPlaceHolder ID="ContentPlaceHolder1" runat="server">
            </asp:ContentPlaceHolder>
        </div>
        </div>
    </form>
</body>
</html>

Step 2: Write the code in code behind file like this

using System;
using System.Collections.Generic;
using System.Linq;
using System.Web;
using System.Web.UI;
using System.Web.UI.WebControls;
 
namespace MultilanguageSample
{
    public partial class Site1 : System.Web.UI.MasterPage
    {
       
        protected void Page_Load(object sender, EventArgs e)
        {
            if (Session["language"] != null && !IsPostBack)
            {
                DropDownList_Language.ClearSelection();
                DropDownList_Language.Items.FindByValue(Session["language"].ToString()).Selected = true;
            }
        }
        protected void DropDownList_Language_SelectedIndexChanged(object sender, EventArgs e)
        {
            switch (DropDownList_Language.SelectedValue)
            {
                case "en-US": this.SetMyNewCulture("en-US");
                    break;
                case "sv-SE": this.SetMyNewCulture("sv-SE");
                    break;
                default:
                    break;
            }
            Response.Redirect(Request.Path);
        }
 
        private void SetMyNewCulture(string culture)
        {
            Session["language"] = culture;
        }
    }
}

Note: Here you can also store the user language selection in cookies or Local Storage of Html 5 using JavaScript. This can be used to maintain the user preference language at page Load.

Step 3 : Create a “App_LocalResources” folder and add the resources as page wise Like Site.master .resx for English and Site1.Master.sv. resx for Swedish

Note: Keep the separate resource file for each page for better maintainability.

EnglishRes

Step 4: Add this method in global.asax file


void Application_AcquireRequestState(object sender, EventArgs e)
       {
           HttpContext context = HttpContext.Current;
           if (context.Session["language"] != null)
           {
               Thread.CurrentThread.CurrentUICulture = new CultureInfo(context.Session["language"].ToString().Trim());
               Thread.CurrentThread.CurrentCulture = new CultureInfo(context.Session["language"].ToString().Trim());
           }
       }

This is used for getting the current state of session.

Step 5: Call the resource key on label like this as a page wise.

You call also call the resource file in C# like this


protected void Page_Load(object sender, EventArgs e)
       {
          lblMsg.Text = GetLocalResourceObject("lblMsgHome.Text").ToString();
           
       }

What is the use of . noConflict() Method In Jquery ?


Do you ever think the scenario if you have to use other JavaScript Framework which has $ Symbol Identifier and JQuery function has also $ symbol Identifier in same html page? Does the JQuery function work?

No it does not work. There will be conflict with other F/w Function.

Then you can solve that conflict using . noConflict() method

Suppose if you want to create your own shortcut in JQuery then how can you create in JQuery?

Using .noConflict method you can create your own shortcut.

Advantage of .noConclict() method

1. You can avoid the conflict in JQuery and other JavaScript F/w

Noconflict2

2. You can create your own JQuery shortcut Identifier.

Noconflict1