How to implement Angular Js UI-Grid in Asp.net MVC ?


UI-Grid is one of the most popular and stable open source angularJs Grid. It is completely written using angular js. It is very fast. It contains almost all the features which contains the commercial third party grid controls.

For more details, please go to this official site

http://ui-grid.info/

To implement in asp.net MVC, we can do like this

Step 1: Create the asp.net MVC application.

Step 2: Create the tblEmp with (Id,EmpName,EmpAddress,EmailId) field in database and keep some data for demo.

Step 3: Create the Emp Model class like this in Model folder

namespace UI_Grid_Sample.Models
{
    public class Emps
    {
        public int Id { get; set; }
        public string EmpName { get; set; }
        public string EmpAddress { get; set; }
        public string EmailId { get; set; }
        public string Operation { get; set; }
    }
}

Step 4: Create the Emp Controller using Asp.net Web API and Write the code to Fetch data from tblEmp like this


using System;
using System.Collections.Generic;
using System.Web.Http;
using System.Data.SqlClient;
using UI_Grid_Sample.Models;

namespace UI_Grid_Sample.Services
{
    public class EmpController : ApiController
    {
        const string sConnString = "Data Source=(LocalDB)\\v11.0;AttachDbFilename=|DataDirectory|\\Database1.mdf;Integrated Security=True";

        List<Emps> MyEmps = new List<Emps>();
       

        [HttpPost]
        public IEnumerable<Emps> FetchBookList(Emps objList)
        {
            using (SqlConnection con = new SqlConnection(sConnString))
            {
                SqlCommand objComm = new SqlCommand("SELECT Id,EmpName,EmpAddress,EmailId FROM tblEmp", con);
                con.Open();

                SqlDataReader reader = objComm.ExecuteReader();

                while (reader.Read())
                {
                    MyEmps.Add(new Emps
                    {
                        Id = Convert.ToInt32(reader["Id"]),
                        EmpName = reader["EmpName"].ToString(),
                        EmpAddress = reader["EmpAddress"].ToString(),
                        EmailId =  reader["EmailId"].ToString()
                    });
                }
                con.Close();
            }

            return MyEmps;
        }

        
    }
}  

Step 5: Create One controller in asp.net MVC i.e. Emp

using System.Web.Mvc;

namespace UI_Grid_Sample.Controllers
{
    public class EmpController : Controller
    {
        //
        // GET: /Emp/

        public ActionResult Index()
        {
            return View();
        }

    }
}
 

Step 5: Create a view and add the reference for angularjs, UIGrid, UIGrid Css and write the code for consuming consuming Web API method in AngularJs as given below


@{
    ViewBag.Title = "Index";
}
<script src="http://ajax.googleapis.com/ajax/libs/angularjs/1.5.0/angular.js"></script>
 <script src="http://ui-grid.info/release/ui-grid.js"></script>
 <link rel="stylesheet" href="http://ui-grid.info/release/ui-grid.css" type="text/css">

   
    <style>
        p, div {
            font:15px Verdana;
        }
        .uiGrd {
            width: 580px;
            height: 200px;
        }
    </style>

<script type="text/javascript">
    var myApp = angular.module('myApp', ['ui.grid']);
    myApp.controller('myController',
        function ($scope, $http) {

            FetchEmpList('READ');

            function FetchEmpList(ops) {
                var request = {
                    method: 'post',
                    url: '/api/emp/',
                    data: {
                        Operation: ops
                    },
                    dataType: 'json',
                    contentType: "application/json"
                };

                $scope.arrEmps = new Array;

                // POST DATA WITH $http.
                $http(request)
                    .success(function (data) {
                        var i = 0;      // JUST A COUNTER.

                        // LOOP THROUGH EACH DATA.
                        angular.forEach(data, function () {
                            var b = {
                                EmpId: data[i].Id,
                                EmpName: data[i].EmpName,
                                EmpAddress: data[i].EmpAddress,
                                EmailId: data[i].EmailId
                            };

                            $scope.arrEmps.push(b);
                            i += 1;
                        });

                    })
                    .error(function () {

                    });

                $scope.gridData = { data: 'arrEmps' };
            };
        });

</script>

<h2>Sample code for AngularJs GridUI </h2>

<div ng-app="myApp"  ng-controller="myController">
       
        
        <div class="uiGrd" id="grd" ui-grid="gridData"></div>
</div>


Sub-routing in angular 5 (Part 8)


If we have to display page with in other page then we can go for angular sub routing. Before reading this post, please go through this post. This is just extension of previous post

Angular Routing Part 7

Step 1 : For sub routing demo we will create some more component i.e. Users and Userlist
ng g c users
ng g c userList

Step 2: Go to the app.module.ts and add this code for sub route menu


 {path:'user',children:[
  {path:'list',component:UserlistComponent,children:[
  {path:'detail/:name', component:UsersComponent }
  ]


Complete code for this file


import { BrowserModule } from '@angular/platform-browser';
import { NgModule } from '@angular/core';
import {RouterModule,Routes} from '@angular/router'

import { AppComponent } from './app.component';
import { HomeComponent } from './home/home.component';
import { AboutComponent } from './about/about.component';
import { ContactComponent } from './contact/contact.component';
import { UserlistComponent } from './userlist/userlist.component';
import { UsersComponent } from './users/users.component';

const appRoutes:Routes=[
  {path:'home',component:HomeComponent},
  {path:'about',component:AboutComponent},
  {path:'contact',component:ContactComponent},

  {path:'user',children:[
  {path:'list',component:UserlistComponent,children:[
  {path:'detail/:name', component:UsersComponent }
  ]

  }
  ]},
  {path:'', redirectTo:'/home',pathMatch:'full' },
  
  {path:'**' ,redirectTo:'/home',pathMatch:'full'} 
];


@NgModule({
  declarations: [
    AppComponent,
    HomeComponent,
    AboutComponent,
    ContactComponent,
    UserlistComponent,
    UsersComponent
   
  ],
  imports: [
    BrowserModule,RouterModule.forRoot(appRoutes)
  ],
  providers: [],
  bootstrap: [AppComponent]
})
export class AppModule { }

Step 3: Go to the app.component.html page and add a menu for user like this


<ul>
  <li>
    <a routerLink="/home">Home</a>
  </li>
   <li>
    <a routerLink="/about">About Us</a>
  </li>
  <li>
    <a routerLink="/contact">Contact Us</a>
  </li>
  <li>
    <a routerLink="/user/list">User</a>
  </li>
</ul>
<router-outlet> </router-outlet> 

Step 4: Go to userlist.component.ts file add an array of user to display like this

import { Component, OnInit } from '@angular/core';

@Component({
  selector: 'app-userlist',
  templateUrl: './userlist.component.html',
  styleUrls: ['./userlist.component.css']
})
export class UserlistComponent implements OnInit {

users= [
  {name:'Ram'},
   {name:'Mohan'},
    {name:'Hari'},
     {name:'John'}
];

  constructor() { }

  ngOnInit() {
  }

}

Step 5: Go to the userlist.component.html and write the code for linking the user to user page and Keep the place holder for displaying user details like this


<div class="container">
  <h2>User list page</h2>
  <ul class="para">
    <li *ngFor="let user of users" [routerLink]="['detail', user.name]"> {{ user.name }} </li>
  </ul>
  <router-outlet></router-outlet>
</div> 

Step 6: Go to the users.component.ts page write the code to display data on basic of input parameter which is being passed from Userlist page.

import { Component, OnInit } from '@angular/core';
import { ActivatedRoute } from '@angular/router';


@Component({
  selector: 'app-users',
  templateUrl: './users.component.html',
  styleUrls: ['./users.component.css']
})
export class UsersComponent implements OnInit {
   name:any;
   sub:any;

  constructor(private route:ActivatedRoute) { }

  ngOnInit() {
    this.sub=this.route.params.subscribe(Params=>{
      this.name=Params['name']
    })
  }

}

Step 7: Go to the Userlist.Component.html page and write the code to display the name of user like this

<div class="container">
<h2>User Page</h2>
<p>Name: {{name}}</p>
</div>

Now compile the code, you will see example of sub routing in angular 5.

Routing in angular 5. (Part 7)


Routing is one of the core concept to create the single page application using angular framework. Routing help us to navigate the one page to other page without making the post back.

In this post we will see, how to implement the simple routing functionality using angular 5.

Step 1: Create the angular project using visual code
ng new my-Sample

Step 2: Create the angular component for Home,About,Contact us like this
ng g c home
ng g c about
ng g c contact

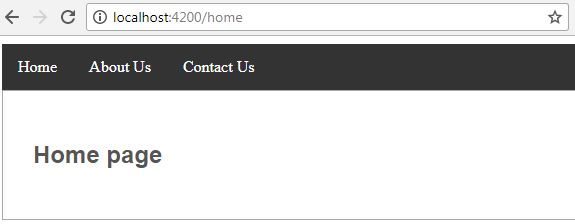
Step 3: Now go to the angular application, You will get Home, About and contact component in App folder
In home.component.html file change the code like

      <div class="container">
      <h2>Home  page</h2>
   </div>
 

Step 4: Change the code for about and contact page.
Step 5: Go to the root folder of style.css file and add the class for container and Menu like this


.container
{
  border: 1px solid #AAA;
  padding: 30px;
}
h2,h3
{
    color: #555;
    font-family: sans-serif;
}

ul {
  list-style-type: none;
  margin: 0;
  padding: 0;
  overflow: hidden;
  background-color: #333;
}

li {
  float: left;
}

li a {
  display: block;
  color: white;
  text-align: center;
  padding: 14px 16px;
  text-decoration: none;
}

li a:hover:not(.active) {
  background-color: #111;
}

.active {
  background-color: #4CAF50;
}
 

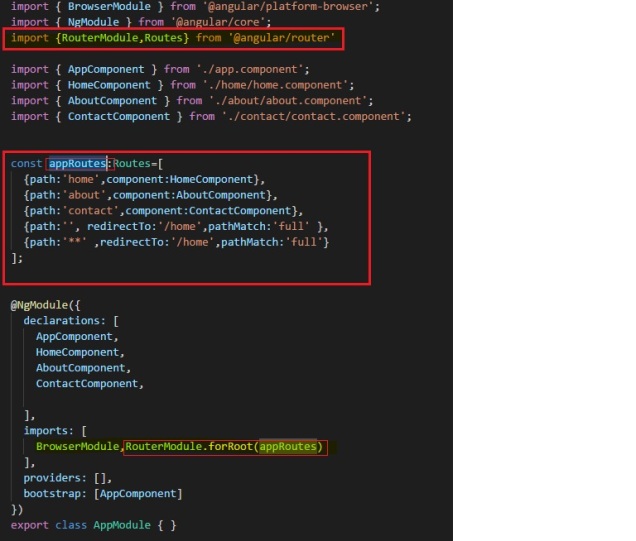
Step 6: Go to the app.module.ts file add the routing related code like this

Note: in above code we using the routing functionalig of angular so we are importing
import {RouterModule,Routes} from ‘@angular/router’

This is the syntax making rout in angular. It will tell which component should be invoked on click of Menu item.

Below two line of code is used for making default rout to Home component if the user will type blank or some other char in URL.

const appRoutes:Routes=[
  {path:'home',component:HomeComponent},
  {path:'about',component:AboutComponent},
  {path:'contact',component:ContactComponent},

  {path:'', redirectTo:'/home',pathMatch:'full' },
  {path:'**' ,redirectTo:'/home',pathMatch:'full'} 
]; 

Complete code is as given below

import { BrowserModule } from '@angular/platform-browser';
import { NgModule } from '@angular/core';
import {RouterModule,Routes} from '@angular/router'

import { AppComponent } from './app.component';
import { HomeComponent } from './home/home.component';
import { AboutComponent } from './about/about.component';
import { ContactComponent } from './contact/contact.component';

const appRoutes:Routes=[
  {path:'home',component:HomeComponent},
  {path:'about',component:AboutComponent},
  {path:'contact',component:ContactComponent},
  {path:'', redirectTo:'/home',pathMatch:'full' },
  
  {path:'**' ,redirectTo:'/home',pathMatch:'full'} 
];

@NgModule({
  declarations: [
    AppComponent,
    HomeComponent,
    AboutComponent,
    ContactComponent,
   
  ],
  imports: [
    BrowserModule,RouterModule.forRoot(appRoutes)
  ],
  providers: [],
  bootstrap: [AppComponent]
})
export class AppModule { }

Step 7: Go to the app.component.html file and give the place holder for menu and html page as given below

<ul>
  <li>
    <a routerLink="/home">Home</a>
  </li>
   <li>
    <a routerLink="/about">About</a>
  </li>
   <li>
    <a routerLink="/user/list">User</a>
  </li>
</ul>
<router-outlet> </router-outlet>

Note : is placeholder for rendering the html page on click event of menu items.

npm install -g @angular/cli is not working


Recently while working with angular 5 project my angular/cli was corrupted. I was trying to repair the CLI by re-installing like this

npm install -g @angular/cli

But it was not installing the cli.

I fixed the problem like this

Step 1: Go to visual studio terminal and type the command like this
npm uninstall -g angular-cli

Step 2: Clear the cache using this command
npm cache clear –force

Step 3: Remove the roaming folder from this location
a. C:\Users\\AppData\Roaming\npm\
b. C:\Users\\AppData\Roaming\npm-cache

Step 4: Install the latest cli like this

npm install -g @angular/cli@latest

I hope this will help to some one.

What is the Services in Angular 5 ? (Part 6)


Services in the Angular 5 is the reusable entities which are instantiated once and can be used by multiple components.

we can use the service to make the entities as global in entire application.

In this post, we will see
1. how to create service using Angular CLI
2. how to write code in service.
3. How to consume the service method in component.

This is just rearranging the code of my previous post.

Step 1: Go to the Visual Studio Code Terminal and create the emps service like this

Angular Service code will be like this

import { Injectable } from '@angular/core';

@Injectable()
export class empsService {

  constructor() {

   }

}

Note:@Injectable() is a decorator used with angular services.

Step 2: Create one separate type script class i.e. emps.class.ts to keep the Emp Properties.

export class Emp {
    empId: number;
    emailId: string;
    mobileNum: number;
    address: string;
  
  }

Step 3: Now will add some records in emps.Service.ts file, which will be shared in entire application

import { Injectable } from '@angular/core';
import {Emp} from './emps.class'

@Injectable()
export class EmpsService {
  rowEmps: Emp[] =[ 
    {
    empId: 2000,
    emailId: "Chandradev1@gmail.com",
    mobileNum: 9241503288,
    address: "Bangalore1"
  },
  {
    empId: 2001,
    emailId: "Chandradev2@gmail.com",
    mobileNum: 9241503288,
    address: "Bangalore2"
  },
  {
    empId: 2002,
    emailId: "Chandradev3@gmail.com",
    mobileNum: 9241503288,
    address: "Bangalore"
  },
  {
    empId: 2003,
    emailId: "Chandradev4@gmail.com",
    mobileNum: 9241503288,
    address: "Bangalore3"
  }
]
  constructor() { }

 //Method call the defauls emps
 getEmps():Emp[] {
   return this.rowEmps;
 }

}

Step 4: Now we will consume the service in emp.component.ts file like this

import { Component, OnInit } from '@angular/core';
import {Emp} from '../emps.class';
import { FormsModule } from '@angular/forms';
import {EmpsService} from '../emps.service';


@Component({
  selector: 'app-emp',
  templateUrl: './emp.component.html',
  styleUrls: ['./emp.component.css'],
  providers:[EmpsService]
})

//Initalization of Emp properties
export class EmpComponent implements OnInit {
 
  empId: number;
  emailId: string;
  mobileNum: number;
  address: string;
  emps: Emp[];

// Adding the default value to emp array 
  constructor(private empSer:EmpsService) {
    this.ClearEmpData();
 
  
    // Consuming the getMethod from Service Class
    this.emps=empSer.getEmps();
  }
  ngOnInit() {
  }
  
  //Storing the value in Emp Array
  CreateEmp(){
    let newEmp : Emp= {
      empId:this.empId,
      emailId:this.emailId,
      mobileNum:this.mobileNum,
      address:this.address
    };
    this.emps.push(newEmp);

    this.ClearEmpData();
  }

  // This is for clearing the Emp values 
  private ClearEmpData() { 
    this.empId = null;
    this.emailId = '';
    this.mobileNum = null;
    this.address = '';
  }
}

Step 5: write the custom css class in emp.component.cs file like this


.emp {
    padding: 20px;
    background: #343434;
    color: #e4e4e4;
    border-radius: 10px;
    margin-bottom: 5px;
}

Step 6: Apply this css class in our previously created emp.component.html page like this


<div>
    <fieldset>
        <legend>  <b> Emp Details</b></legend>
       <ul *ngFor="let i of emps" >
           <div class="emp">
          <span> EmpId: {{i.empId}} <br> </span>
          <span>Emp EmailId: {{i.emailId}} <br> </span>
          <span> Emp Mobile Num: {{i.mobileNum}} <br></span>
          <span> Emp Address: {{i.address}} </span>
        </div>
       </ul>
    </fieldset>
 
</div>


<div>
    <fieldset>
        <legend>  <b> Emp Entry Screen with two way data binding demo</b></legend>
        <label> {{ empId }} </label>
<div>
 <b>EmpId:</b>   <input [(ngModel)]="empId" placeholder="enter empId">
</div>
<br>
<label> {{ emailId }} </label>
<div>
    <b>Email Id:</b>   <input [(ngModel)]="emailId" placeholder="enter emp EmailId">
</div>
<br>
<label> {{ mobileNum }} </label>
<div>
    <b>Mobile Number:</b>  <input [(ngModel)]="mobileNum" placeholder="enter mobile Number">
</div>
<br>
<label> {{ address }} </label>
<div>
    <b>Emp Address:</b>   <input [(ngModel)]="address" placeholder="enter address">
</div><br>
<br>
<button class="btn btn-primary" (click)="CreateEmp()"> Save </button>
                      
</fieldset>
 
</div>

Now save and compile the code using ng serve command. You will see the above output.