How to implement the Angular switch case in Angular 5 ?


Switch case in angular is a combination of 3 directives
1. ngSwitch directive
2. ngSwitchCase directive
3. ngSwitchDefault directive

If we have display some Text Value for some key value then we can use this syntax. It is similar to C# switch statement.

Syntax for using Switch in Angular is like this

<div class="col-xs-6" [ngSwitch]="employee.department">
              : 
              <span *ngSwitchCase="1"> Help Desk </span>
              <span *ngSwitchCase="2"> HR </span>
              <span *ngSwitchCase="3"> IT </span>
              <span *ngSwitchCase="4"> Payroll </span>
              <span *ngSwitchDefault> N/A </span>
            </div>

How to implement Bootstrap and Custom CSS class in Angular 5 ?


In this post we will see how to integrate the Bootstrap css and custom css class in our application.
for this functionality we have to do the following steps

Approach 1

Step 1: Go the node command terminal and run this command

npm install bootstrap@3 –save

Step 2: Once Bootstrap is installed, open .angular-cli.json file and specify the path to the Bootstrap stylesheet (bootstrap.min.css) in the styles property as shown below.

“styles”: [
“../node_modules/bootstrap/dist/css/bootstrap.min.css”,
“styles.css”

]

Approach 2:

Implementing CDN file path directly on index.html or importing the path in styles.css file like this

<!doctype html>
<html lang="en">
<head>
  <meta charset="utf-8">
  <title>MySample</title>
  <base href="/">

  <meta name="viewport" content="width=device-width, initial-scale=1">
  <link rel="icon" type="image/x-icon" href="favicon.ico">

  <link rel="stylesheet" href="https://maxcdn.bootstrapcdn.com/bootstrap/3.3.7/css/bootstrap.min.css" integrity="sha384-BVYiiSIFeK1dGmJRAkycuHAHRg32OmUcww7on3RYdg4Va+PmSTsz/K68vbdEjh4u" crossorigin="anonymous">


</head>
<body>
  <app-root>Loading -----</app-root>
  <script src="https://code.jquery.com/jquery-3.1.1.min.js" integrity="sha256-hVVnYaiADRTO2PzUGmuLJr8BLUSjGIZsDYGmIJLv2b8=" crossorigin="anonymous"></script>
  <script src="https://maxcdn.bootstrapcdn.com/bootstrap/3.3.7/js/bootstrap.min.js" integrity="sha384-Tc5IQib027qvyjSMfHjOMaLkfuWVxZxUPnCJA7l2mCWNIpG9mGCD8wGNIcPD7Txa" crossorigin="anonymous"></script>

</body>
</html>


How to do confirm password validation in Angular 5


In Angular 5 doesn’t support inbuilt validation process for confirm password functionality. For this we have to create our own custom validator code.

Step 1. Create the confirm-equal-validator.directive.ts file then write the code like this


import { Validator, NG_VALIDATORS, AbstractControl } from "@angular/forms";
import { Directive } from "@angular/core";


@Directive({
    selector:'[appConfirmEqualValidator]',
    providers:[{
        provide: NG_VALIDATORS,
        useExisting: ConfirmEqualValidatorDirective,
        multi: true
    }]

})

export class ConfirmEqualValidatorDirective implements Validator {
    validate(passwordGroup: AbstractControl): { [key: string]: any } | null {
        const passwordField = passwordGroup.get('password');
        const confirmPasswordField = passwordGroup.get('confirmPassword');
        if (passwordField && confirmPasswordField &&
            passwordField.value !== confirmPasswordField.value) {
            return { 'notEqual': true };
        }

        return null;
    }
}
  

Step 2: Go to the HTML page implement the code like this

<div ngModelGroup="passwordGroup" #passwordGroup="ngModelGroup"
      appConfirmEqualValidator [class.has-error]="passwordGroup.errors?.notEqual
      && !confirmPassword.errors?.required">

  <div class="form-group"
        [class.has-error]="password.touched && password.invalid">
    <label for="password" class="control-label">Password</label>
    <input name="password" required type="text" class="form-control"
            [(ngModel)]="employee.password" #password="ngModel">
    <span class="help-block"
          *ngIf="password.touched && password.errors?.required">
      Password is required
    </span>
  </div>

  <div class="form-group"
        [class.has-error]="confirmPassword.touched && confirmPassword.invalid">
    <label for="confirmPassword" class="control-label">Confirm Password</label>
    <input name="confirmPassword" required type="text" class="form-control"
            [(ngModel)]="employee.confirmPassword" #confirmPassword="ngModel">
    <span class="help-block"
          *ngIf="confirmPassword.touched && confirmPassword.errors?.required">
      Confirm Password is required
    </span>
    <span class="help-block" *ngIf="confirmPassword.touched &&
          passwordGroup.errors?.notEqual && !confirmPassword.errors?.required">
      Password and Confirm Password does not match
    </span>
  </div>
   </div>

In the above code we show that NgModelGroup Directive use to create a sub-group within a form and it is useful to validate a sub-group of elements on the form.

Step 3: Go to the app.module.ts file import the code like this

import {ConfirmEqualValidatorDirective } from ‘./shared/confirm-equal-validator.directive’;

and in @NgModule({
ConfirmEqualValidatorDirective

})

Sub-routing in angular 5 (Part 8)


If we have to display page with in other page then we can go for angular sub routing. Before reading this post, please go through this post. This is just extension of previous post

Angular Routing Part 7

Step 1 : For sub routing demo we will create some more component i.e. Users and Userlist
ng g c users
ng g c userList

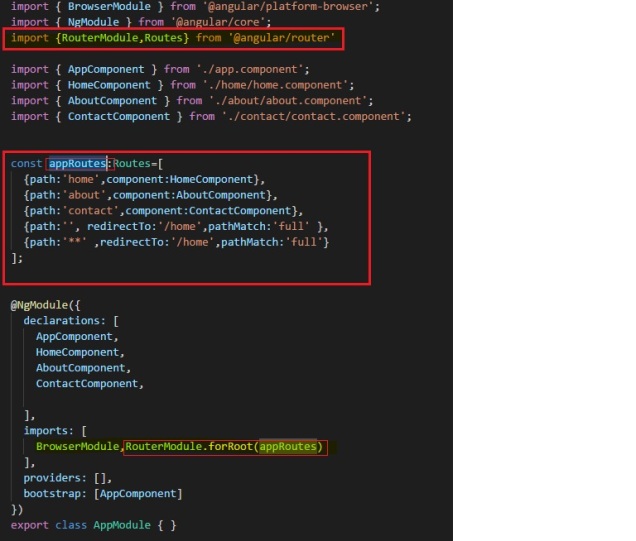
Step 2: Go to the app.module.ts and add this code for sub route menu


 {path:'user',children:[
  {path:'list',component:UserlistComponent,children:[
  {path:'detail/:name', component:UsersComponent }
  ]


Complete code for this file


import { BrowserModule } from '@angular/platform-browser';
import { NgModule } from '@angular/core';
import {RouterModule,Routes} from '@angular/router'

import { AppComponent } from './app.component';
import { HomeComponent } from './home/home.component';
import { AboutComponent } from './about/about.component';
import { ContactComponent } from './contact/contact.component';
import { UserlistComponent } from './userlist/userlist.component';
import { UsersComponent } from './users/users.component';

const appRoutes:Routes=[
  {path:'home',component:HomeComponent},
  {path:'about',component:AboutComponent},
  {path:'contact',component:ContactComponent},

  {path:'user',children:[
  {path:'list',component:UserlistComponent,children:[
  {path:'detail/:name', component:UsersComponent }
  ]

  }
  ]},
  {path:'', redirectTo:'/home',pathMatch:'full' },
  
  {path:'**' ,redirectTo:'/home',pathMatch:'full'} 
];


@NgModule({
  declarations: [
    AppComponent,
    HomeComponent,
    AboutComponent,
    ContactComponent,
    UserlistComponent,
    UsersComponent
   
  ],
  imports: [
    BrowserModule,RouterModule.forRoot(appRoutes)
  ],
  providers: [],
  bootstrap: [AppComponent]
})
export class AppModule { }

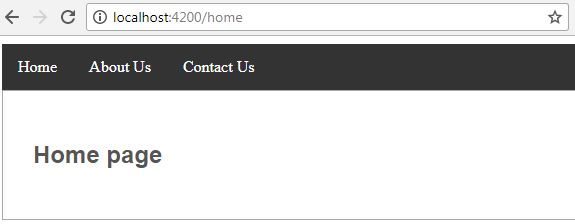
Step 3: Go to the app.component.html page and add a menu for user like this


<ul>
  <li>
    <a routerLink="/home">Home</a>
  </li>
   <li>
    <a routerLink="/about">About Us</a>
  </li>
  <li>
    <a routerLink="/contact">Contact Us</a>
  </li>
  <li>
    <a routerLink="/user/list">User</a>
  </li>
</ul>
<router-outlet> </router-outlet> 

Step 4: Go to userlist.component.ts file add an array of user to display like this

import { Component, OnInit } from '@angular/core';

@Component({
  selector: 'app-userlist',
  templateUrl: './userlist.component.html',
  styleUrls: ['./userlist.component.css']
})
export class UserlistComponent implements OnInit {

users= [
  {name:'Ram'},
   {name:'Mohan'},
    {name:'Hari'},
     {name:'John'}
];

  constructor() { }

  ngOnInit() {
  }

}

Step 5: Go to the userlist.component.html and write the code for linking the user to user page and Keep the place holder for displaying user details like this


<div class="container">
  <h2>User list page</h2>
  <ul class="para">
    <li *ngFor="let user of users" [routerLink]="['detail', user.name]"> {{ user.name }} </li>
  </ul>
  <router-outlet></router-outlet>
</div> 

Step 6: Go to the users.component.ts page write the code to display data on basic of input parameter which is being passed from Userlist page.

import { Component, OnInit } from '@angular/core';
import { ActivatedRoute } from '@angular/router';


@Component({
  selector: 'app-users',
  templateUrl: './users.component.html',
  styleUrls: ['./users.component.css']
})
export class UsersComponent implements OnInit {
   name:any;
   sub:any;

  constructor(private route:ActivatedRoute) { }

  ngOnInit() {
    this.sub=this.route.params.subscribe(Params=>{
      this.name=Params['name']
    })
  }

}

Step 7: Go to the Userlist.Component.html page and write the code to display the name of user like this

<div class="container">
<h2>User Page</h2>
<p>Name: {{name}}</p>
</div>

Now compile the code, you will see example of sub routing in angular 5.

Routing in angular 5. (Part 7)


Routing is one of the core concept to create the single page application using angular framework. Routing help us to navigate the one page to other page without making the post back.

In this post we will see, how to implement the simple routing functionality using angular 5.

Step 1: Create the angular project using visual code
ng new my-Sample

Step 2: Create the angular component for Home,About,Contact us like this
ng g c home
ng g c about
ng g c contact

Step 3: Now go to the angular application, You will get Home, About and contact component in App folder
In home.component.html file change the code like

      <div class="container">
      <h2>Home  page</h2>
   </div>
 

Step 4: Change the code for about and contact page.
Step 5: Go to the root folder of style.css file and add the class for container and Menu like this


.container
{
  border: 1px solid #AAA;
  padding: 30px;
}
h2,h3
{
    color: #555;
    font-family: sans-serif;
}

ul {
  list-style-type: none;
  margin: 0;
  padding: 0;
  overflow: hidden;
  background-color: #333;
}

li {
  float: left;
}

li a {
  display: block;
  color: white;
  text-align: center;
  padding: 14px 16px;
  text-decoration: none;
}

li a:hover:not(.active) {
  background-color: #111;
}

.active {
  background-color: #4CAF50;
}
 

Step 6: Go to the app.module.ts file add the routing related code like this

Note: in above code we using the routing functionalig of angular so we are importing
import {RouterModule,Routes} from ‘@angular/router’

This is the syntax making rout in angular. It will tell which component should be invoked on click of Menu item.

Below two line of code is used for making default rout to Home component if the user will type blank or some other char in URL.

const appRoutes:Routes=[
  {path:'home',component:HomeComponent},
  {path:'about',component:AboutComponent},
  {path:'contact',component:ContactComponent},

  {path:'', redirectTo:'/home',pathMatch:'full' },
  {path:'**' ,redirectTo:'/home',pathMatch:'full'} 
]; 

Complete code is as given below

import { BrowserModule } from '@angular/platform-browser';
import { NgModule } from '@angular/core';
import {RouterModule,Routes} from '@angular/router'

import { AppComponent } from './app.component';
import { HomeComponent } from './home/home.component';
import { AboutComponent } from './about/about.component';
import { ContactComponent } from './contact/contact.component';

const appRoutes:Routes=[
  {path:'home',component:HomeComponent},
  {path:'about',component:AboutComponent},
  {path:'contact',component:ContactComponent},
  {path:'', redirectTo:'/home',pathMatch:'full' },
  
  {path:'**' ,redirectTo:'/home',pathMatch:'full'} 
];

@NgModule({
  declarations: [
    AppComponent,
    HomeComponent,
    AboutComponent,
    ContactComponent,
   
  ],
  imports: [
    BrowserModule,RouterModule.forRoot(appRoutes)
  ],
  providers: [],
  bootstrap: [AppComponent]
})
export class AppModule { }

Step 7: Go to the app.component.html file and give the place holder for menu and html page as given below

<ul>
  <li>
    <a routerLink="/home">Home</a>
  </li>
   <li>
    <a routerLink="/about">About</a>
  </li>
   <li>
    <a routerLink="/user/list">User</a>
  </li>
</ul>
<router-outlet> </router-outlet>

Note : is placeholder for rendering the html page on click event of menu items.