Different ways of doing serialization and deserialization in .Net (Asp.net/Asp.net MVC) (Part 3)


Method1

Method 1: Using System.Runtime.Serialization.Json Namespace

Method 2: Using System.Web.Script.Serialization Namespace

Method 3:

In this method we will use the Newtonsoft.Json dll

This is one of the most popular open source dll, we install it from Nuget package manager or from google download it and add to our project

We can write code as given below


using Newtonsoft.Json;
using System;

namespace WebApplication1
{
    public partial class Demo3 : System.Web.UI.Page
    {
        protected void Page_Load(object sender, EventArgs e)
        {
            EmpDemo objEmp = new EmpDemo
            {
                Id = 1021,
                EmpName = "Chandradev",
                EmpAddress = "Bangalore"
            };

            string jsonData = JsonConvert.SerializeObject(objEmp);
            Response.Write("<b>Converting to Json </b> " + "</br>");
            Response.Write("</br>");
            Response.Write(jsonData);
            Response.Write("</br>");

            var objEmp1 = JsonConvert.DeserializeObject<EmpDemo>(jsonData);
            Response.Write("</br>");
            Response.Write("Converting Json to .Net Object:");
            Response.Write("</br>");
            Response.Write("Id: " + objEmp1.Id + "</br>");
            Response.Write("EmpName: " + objEmp1.EmpName + "</br>");
            Response.Write("EmpAddress: " + objEmp1.EmpAddress + "</br>");
        }

        public class EmpDemo
        {
            public int Id { get; set; }
            public string EmpName { get; set; }
            public string EmpAddress { get; set; }
        }
    }
}

Note: donot forget to include the Newtonsoft.Json namespace in your code. This approach can be used in Asp.net or asp.net mvc application.
Different ways of doing serialization and deserialization in .Net (Asp.net/Asp.net MVC)(Part 2)


different-ways-of-doing-serialization-and-deserialization-in-net-asp-netasp-net-mvc (Part 1)

Method 2 approach

we will use System.Web.Script.Serialization namespace of .net framework

Step 1: Create the EmpDemo Class and write the code in code behind file like given below


using System;
using System.Web.Script.Serialization;

namespace WebApplication1
{
    public partial class Demo1 : System.Web.UI.Page
    {
        protected void Page_Load(object sender, EventArgs e)
        {
            EmpDemo objEmp = new EmpDemo
            {
                Id = 1021,
                EmpName = "Chandradev",
                EmpAddress = "Bangalore"
            };

            JavaScriptSerializer js = new JavaScriptSerializer();

            Response.Write("<b>Converting to Json </b> " + "</br>");
            Response.Write("</br>");
            string jsonData = js.Serialize(objEmp);
            Response.Write(jsonData);
            Response.Write("</br>");

            var objEmp1 = js.Deserialize(jsonData);
            Response.Write("</br>");
            Response.Write("<b> Converting Json to .Net Object: </b>");
            Response.Write("</br>");
            Response.Write("Id: " + objEmp1.Id + "</br>");
            Response.Write("EmpName: " + objEmp1.EmpName + "</br>");
            Response.Write("EmpAddress: " + objEmp1.EmpAddress + "</br>");
        }
    }

    public class EmpDemo
    {
        public int Id { get; set; }
        public string EmpName { get; set; }
        public string EmpAddress { get; set; }
    }
}

Summary: This approach will be suitable in asp.net or asp.net mvc application.

Different ways of doing serialization and deserialization in .Net (Asp.net/Asp.net MVC)(Part1)


Nowadays so many times we will get requirement to do serialization and deserialization process in .net application.
Firstly we will know what this process is,

Serialization: It is the process of converting an object into a stream of bytes in order to store the object or transmit it to memory, a database, or a file. Its main purpose is to save the state of an object in order to be able to recreate it when needed.

Deserialization: It is the reverse process of Serialization.

In asp.net we can achieve it using so many ways

1. Using System.Runtime.Serialization.Json Namespace

2. Using System.Web.Script.Serialization; Namespace

3. Using Newtonsoft.Json; Open Source dll

Method 1 : using System.Runtime.Serialization.Json Namespace

In approach we will firstly create the C# object then convert into Json object and revert back to its original state

Step1: Create the C# Class like this and use System.Runtime.Serialization namespace as given below

using System.Runtime.Serialization;

namespace WebApplication1
{
    [DataContract]
    public class Emp
    {
        [DataMember]
        public int Id { get; set; }

        [DataMember]
        public string EmpName { get; set; }

        [DataMember]
        public string EmpAddress { get; set; }
    }
}

Step 2:

write the code in code behind file of asp.net as given below

using System;
using System.IO;
using System.Runtime.Serialization.Json;
using System.Text;

namespace WebApplication1
{
    public partial class Demo : System.Web.UI.Page
    {
        protected void Page_Load(object sender, EventArgs e)
        {
        }

        protected void btnMethod1_Click(object sender, EventArgs e)
        {
            //Serilization process using  System.Runtime.Serialization

            Emp objEmp = new Emp()
            {
                Id = 1021,
                EmpName = "Chandradev",
                EmpAddress = "Bangalore"
            };

            DataContractJsonSerializer objJS = new DataContractJsonSerializer(typeof(Emp));
            string json = string.Empty;
            using (MemoryStream objMS = new MemoryStream())
            {
                objJS.WriteObject(objMS, objEmp);
                objMS.Position = 0;
                using (StreamReader sr = new StreamReader(objMS))
                {
                    json = sr.ReadToEnd();
                    Response.Write("<b>Converting to Json </b> " + "</br>");
                    Response.Write("</br>");
                    Response.Write(json);
                    sr.Close();
                    objMS.Close();
                }
            }

            using (var ms = new MemoryStream(Encoding.Unicode.GetBytes(json)))
            {
                Emp objEmp1 = (Emp)objJS.ReadObject(ms);
                Response.Write("</br>");
                Response.Write("</br>");
                Response.Write("<b>Converting Json to .Net Object</b>");
                Response.Write("</br>");
                Response.Write("</br>");
                Response.Write("Id: " + objEmp1.Id + "</br>");
                Response.Write("EmpName: " + objEmp1.EmpName + "</br>");
                Response.Write("EmpAddress: " + objEmp1.EmpAddress + "</br>");
            }
        }
    }
}

Step 3: Now run the application you will see the process of serialization and deserialization.

Summary: This approach will be more suitable in WCF application.

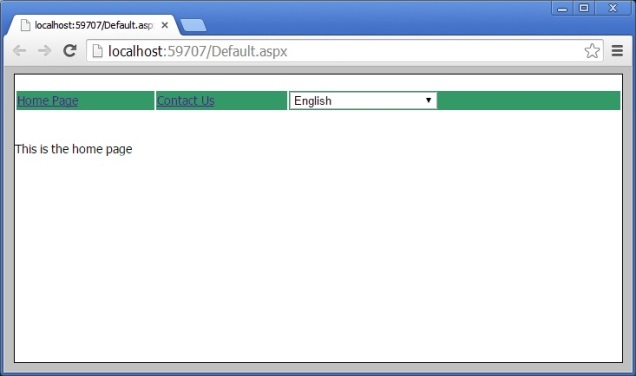
How to create the Multilanguage application in asp.net?


English

Swedish

We can create the Multilanguage application in asp.net like this

Step 1: Add the Master Page Site1.Master and Design the Menu and language Selection dropdown list like this

<%@ Master Language="C#" AutoEventWireup="true" CodeBehind="Site1.master.cs" Inherits="MultilanguageSample.Site1" %>

<!DOCTYPE html>

<html xmlns="http://www.w3.org/1999/xhtml">
<head runat="server">
    <title></title>
    <style type="text/css">
        html {
            font-family: Tahoma;
            font-size: 14px;
            font-style: normal;
            background-color: Silver;
        }

        .Content {
            margin: auto;
            width: 700px;
            background-color: white;
            border: Solid 1px black;
        }
        .auto-style1 {
            width: 100%;
        }
    </style>
    <asp:ContentPlaceHolder ID="head" runat="server">
    </asp:ContentPlaceHolder>
</head>

<body>
    <form id="form1" runat="server">
        <div class="Content">
        <br />
            <table class="auto-style1">
                <tr>
                    <td style="background-color: #339966"> <a href="Default.aspx">
                <asp:Label ID="Label1" meta:resourcekey="menuItemDefault" runat="server" Text="Home"></asp:Label>
            </a></td>
                    <td style="background-color: #339966; " ><a href="Contact.aspx">
            <asp:Label ID="Label2" meta:resourcekey="menuItemContact" runat="server" Text="ContactUs"></asp:Label>
        </a></td>
                    <td style="background-color: #339966;"><asp:DropDownList ID="DropDownList_Language" runat="server" Height="20px" Width="170px"
            OnSelectedIndexChanged="DropDownList_Language_SelectedIndexChanged" AutoPostBack="true">
            <asp:ListItem Value="en-US">English</asp:ListItem>
            <asp:ListItem Value="sv-SE">Swedish</asp:ListItem>
        </asp:DropDownList></td>
                </tr>
            </table>
        <br />
        <br />

        <div>
            <asp:ContentPlaceHolder ID="ContentPlaceHolder1" runat="server">
            </asp:ContentPlaceHolder>
        </div>
        </div>
    </form>
</body>
</html>

Step 2: Write the code in code behind file like this

using System;
using System.Collections.Generic;
using System.Linq;
using System.Web;
using System.Web.UI;
using System.Web.UI.WebControls;
 
namespace MultilanguageSample
{
    public partial class Site1 : System.Web.UI.MasterPage
    {
       
        protected void Page_Load(object sender, EventArgs e)
        {
            if (Session["language"] != null && !IsPostBack)
            {
                DropDownList_Language.ClearSelection();
                DropDownList_Language.Items.FindByValue(Session["language"].ToString()).Selected = true;
            }
        }
        protected void DropDownList_Language_SelectedIndexChanged(object sender, EventArgs e)
        {
            switch (DropDownList_Language.SelectedValue)
            {
                case "en-US": this.SetMyNewCulture("en-US");
                    break;
                case "sv-SE": this.SetMyNewCulture("sv-SE");
                    break;
                default:
                    break;
            }
            Response.Redirect(Request.Path);
        }
 
        private void SetMyNewCulture(string culture)
        {
            Session["language"] = culture;
        }
    }
}

Note: Here you can also store the user language selection in cookies or Local Storage of Html 5 using JavaScript. This can be used to maintain the user preference language at page Load.

Step 3 : Create a “App_LocalResources” folder and add the resources as page wise Like Site.master .resx for English and Site1.Master.sv. resx for Swedish

Note: Keep the separate resource file for each page for better maintainability.

EnglishRes

Step 4: Add this method in global.asax file


void Application_AcquireRequestState(object sender, EventArgs e)
       {
           HttpContext context = HttpContext.Current;
           if (context.Session["language"] != null)
           {
               Thread.CurrentThread.CurrentUICulture = new CultureInfo(context.Session["language"].ToString().Trim());
               Thread.CurrentThread.CurrentCulture = new CultureInfo(context.Session["language"].ToString().Trim());
           }
       }

This is used for getting the current state of session.

Step 5: Call the resource key on label like this as a page wise.

You call also call the resource file in C# like this


protected void Page_Load(object sender, EventArgs e)
       {
          lblMsg.Text = GetLocalResourceObject("lblMsgHome.Text").ToString();
           
       }

How to use log4net in asp.net Project ?


Recently i had used log4net error handling plugin in one of my recent project. Previously i was using enterprise library for this task. But this is very flexible and essay to use in application.
We can use Log4net in our application using this few steps

Step 1: Install the Log4net plugin like this

Log4net

Step2: Inside the Configration section of Webconfig, keep this code related with log4net like this

  
  <configSections>
    <section name="log4net" type="log4net.Config.Log4NetConfigurationSectionHandler,log4net"></section>
  </configSections>

  <log4net>
    <appender name="LogFileAppender" type="log4net.Appender.FileAppender">
      <param name="File" value="C:\MyLog\test.txt"/>
      <layout type="log4net.Layout.PatternLayout">
        <param name="ConversionPattern" value="%d [%t] %-5p %c %m%n"/>
      </layout>
    </appender>
    <root>
      <level value="All" />
      <appender-ref ref="LogFileAppender" />
    </root>
  </log4net>
  

Step 3: In global.aspx file, keep the code like this

protected void Application_Start(object sender, EventArgs e)
{
log4net.Config.XmlConfigurator.Configure();
}

Step 4: Now implement the error handling in your code like this

protected void btnClick_Click(object sender, EventArgs e)
{
log4net.ILog logger = log4net.LogManager.GetLogger(typeof(_Default));
try
{
// This is used for generating the error in code.
int a;
a = Convert.ToInt32(txtNum.Text);
Response.Write(a);
}
catch (Exception ex)
{
logger.Error(ex.StackTrace);
}

}

Now if there will be any exception occur in application then it will create the log in C:\MyLog\test.txt