How to call token based web api in Blazor


Here is the syntax for calling taken based web api in Blazor server or webassembly.

using MyFleetApp.Data.Model;
using System.Net.Http;
using System.Net.Http.Json;
using System.Threading.Tasks;


namespace MyFleetApp.Data.Service
{
    public class InvoiceSearchService : IInvoiceSerach
    {
        private readonly HttpClient httpClient;
        public InvoiceSearchService(HttpClient httpClient)
        {
            this.httpClient = httpClient;
        }
       

        public async Task<Rootobject> GetInvoices(Rootobject objParameter)
        {
            httpClient.DefaultRequestHeaders.Authorization = new System.Net.Http.Headers.AuthenticationHeaderValue("Bearer", objParameter.token);
            var result = await httpClient.PostAsJsonAsync<Rootobject>("Web API URL will be here", objParameter);
            Rootobject objInvoice = new Rootobject();
            if (result.IsSuccessStatusCode)
            {
                objInvoice = await result.Content.ReadFromJsonAsync<Rootobject>();
            }

            return objInvoice;
        }
    }
}

Implementing Swagger in Asp.net Web API Core 3.1 in clean way


What is the Swagger ?

This is one of the best tool for testing web api method. It will also give very good user friendly definition of web api method.

Advantages:
1. We can easily test web api method
2. We will get user friendly documented message about web api method
3. We can easily debug the web api method using this tool.

How to implement in Asp.net Web API Core 3.1 in Clean way ?

Step 1: Firstly create the web api 3.1 project like this

Creating Web Api Core 3.0 layer using Dapper and .net standard 2.0

Step 2: Go to Web API layer and install the swagger related nuget package

Swagger
Swagger

Note: if you are using asp.net core 3.0 or 3.1 then install the swagger version v5.0

Step 3: Create SwaggerExtension.cs file in the Extensions folder of We API Layer and write the Extension Method for IServiceCollection and IApplicationBuilder like this

using Microsoft.AspNetCore.Builder;
using Microsoft.Extensions.DependencyInjection;
using Microsoft.OpenApi.Models;

namespace Dapper_Demo.Extensions
{
    public static class SwaggerExtension
    {
        public static void AddSwagger(this IServiceCollection services)
        {
            // Register the Swagger generator, defining 1 or more Swagger documents
            services.AddSwaggerGen(c =>
            {
                c.SwaggerDoc("v1", new OpenApiInfo { Title = "EmpManagement API", Version = "v1" });
            });
        }

        public static void AddCustomSwagger(this IApplicationBuilder app)
        {
            //Adding Swagger and SwaggerUI
            app.UseSwagger();

            app.UseSwaggerUI(c =>
            {
                c.SwaggerEndpoint("/swagger/v1/swagger.json", "EmpManagement ASP.NET Core API v1");
            });
        }
    }
}

Step 4: Go to the Startup file of application and add the swagger in middleware and service configure like this

Swagger_Middleware
Swagger_Middleware

Step 5: Run the application and type this URL

If you want to download the source code for this demo. You can download from below demo.

https://github.com/Chandradev819/Dapper_Demo_With_Asp.netCore

Creating Web Api Core 3.0 layer using Dapper and .net standard 2.0


Recently I got a chance to work with dapper using .net standard 2.0 So i thought to write my learning with you in this small blog post.

Firstly we will know what is the dapper ?

Dapper is micro ORM(Object Relational Mapper) framework which helps to map database directly with C# object. It is developed by StackOverflow team and released as open source.

Advantages of Dapper

1. It is a high-performance data access system
2. It is database independent
3. Same code work with all relational database.
4. Fewer lines of code.
5. Easy Handling of SQL Query.
6. Easy Handling of Stored Procedure.
7. Dapper also allows fetching multiple data based on multiple inputs.
8. Get generic result for simple or complex data type.
9. ease of use
10. It provides support for both static and dynamic object binding using transactions, stored
procedures, or bulk inserts of data.

In this post I have also used .net standard 2.0, so we have to know what is the advantage of this

Advantages of .net standard 2.0

>> Same code can be shared on all type of .net application. This will be portable. This means you can write and can use in applications that run on multiple platforms. Their purpose is to share code between applications.

Now we will see how to implement in asp.net core web api

In this demo I m going to design the simple demo web api as given below simple architecture

Step 1: Now we will Create the blank empty web api project like this

Step 2: Right click on solution explorer and create the EmpManagement.Entities layers using .net standard 2.0 like this

Step 3: Follow the same steps and create the EmpManagement.Repository

Step 4: Follow the same steps and create the EmpManagement.Repository.Interfaces

Step 5: Create the table and sp in database like this

USE [EmpManagement]
GO
/****** Object:  StoredProcedure [dbo].[AddEmp]    Script Date: 12/12/2019 10:14:54 PM ******/
SET ANSI_NULLS ON
GO
SET QUOTED_IDENTIFIER ON
GO
CREATE PROCEDURE [dbo].[AddEmp]
   @EmpName nvarchar(50),  
    @EmpAddress nvarchar(50),  
    @EmailId nvarchar(50),  
    @MobileNum nvarchar(50)  
   
AS  
 
BEGIN  
SET NOCOUNT ON;  
insert into tblEmp(EmpName, EmpAddress, EmailId, MobileNum)  
      values(@EmpName, @EmpAddress, @EmailId, @MobileNum)  
END  

GO
/****** Object:  StoredProcedure [dbo].[DeleteEmp]    Script Date: 12/12/2019 10:14:54 PM ******/
SET ANSI_NULLS ON
GO
SET QUOTED_IDENTIFIER ON
GO
CREATE PROCEDURE [dbo].[DeleteEmp]
   @Id int
   
AS  
 
BEGIN  
SET NOCOUNT ON;  
DELETE from tblEmp where	Id=@Id 
END  

GO
/****** Object:  StoredProcedure [dbo].[GetAllEmps]    Script Date: 12/12/2019 10:14:54 PM ******/
SET ANSI_NULLS ON
GO
SET QUOTED_IDENTIFIER ON
GO
CREATE PROCEDURE [dbo].[GetAllEmps]
  
   
AS  
 
BEGIN  
SET NOCOUNT ON;  
SELECT * from TBLEMP
END  

GO
/****** Object:  StoredProcedure [dbo].[GetEmpById]    Script Date: 12/12/2019 10:14:54 PM ******/
SET ANSI_NULLS ON
GO
SET QUOTED_IDENTIFIER ON
GO
CREATE PROCEDURE [dbo].[GetEmpById]
  @Id int
   
AS  
 
BEGIN  
SET NOCOUNT ON;  
SELECT * from TBLEMP where Id=@Id
END  

GO
/****** Object:  StoredProcedure [dbo].[UpdateEmp]    Script Date: 12/12/2019 10:14:54 PM ******/
SET ANSI_NULLS ON
GO
SET QUOTED_IDENTIFIER ON
GO
CREATE PROCEDURE [dbo].[UpdateEmp]
  @Id int,
  @EmpName nvarchar(50),
  @EmpAddress nvarchar(50),
  @EmailId nvarchar(50),
  @MobileNum nvarchar(50)

AS  
BEGIN  
SET NOCOUNT ON;  
UPDATE tblEmp SET EmpName=@EmpName,EmpAddress=@EmpAddress,EmailId=@EmailId,MobileNum=@MobileNum where Id=@Id	 
END  

GO
/****** Object:  Table [dbo].[tblEmp]    Script Date: 12/12/2019 10:14:54 PM ******/
SET ANSI_NULLS ON
GO
SET QUOTED_IDENTIFIER ON
GO
CREATE TABLE [dbo].[tblEmp](
	[Id] [int] IDENTITY(1,1) NOT NULL,
	[EmpName] [nvarchar](50) NULL,
	[EmpAddress] [nvarchar](50) NULL,
	[EmailId] [nvarchar](50) NULL,
	[MobileNum] [nvarchar](50) NULL,
 CONSTRAINT [PK_tblEmp] PRIMARY KEY CLUSTERED 
(
	[Id] ASC
)WITH (PAD_INDEX = OFF, STATISTICS_NORECOMPUTE = OFF, IGNORE_DUP_KEY = OFF, ALLOW_ROW_LOCKS = ON, ALLOW_PAGE_LOCKS = ON) ON [PRIMARY]
) ON [PRIMARY]

GO

Step 6: Go to EmpManagement.Entities layer and Create the Emp Entities class like this

using System;

namespace DataManagement.Entities
{
    public class Emp
    {
        public int Id { get; set; }
        public string EmpName { get; set; }
        public string EmpAddress { get; set; }
        public string EmailId { get; set; }
        public string MobileNum { get; set; }
    }
}

Step 7: Go to EmpManagement.Repository.Interfaces layer and Create the generic interface like this

using System.Collections.Generic;

namespace DataManagement.Repository.Interfaces
{

    public interface IEmpRepository<T> where T : class
    {
        IEnumerable<T> GetAllEmp();
        T GetEmpById(int id);
        void AddEmp(T entity);
        void DeleteEmp(int id);
        void UpdateEmp(T entity);
    }


}

Step 8: Create the BaseRepository.cs file in EmpManagement.Repository layer like this

using System;
using System.Data;
using System.Data.SqlClient;

namespace DataManagement.Repository
{
    public class BaseRepository : IDisposable
    {
        protected IDbConnection con;
        public BaseRepository()
        {
            string connectionString = "Data Source=localhost;Initial Catalog=EmpManagement;Integrated Security=True";
            con = new SqlConnection(connectionString);
        }
        public void Dispose()
        {
            throw new NotImplementedException();
        }
    }
}

Step 9: Create the BaseRepository.cs file in EmpManagement.Repository layer like this

using Dapper;
using DataManagement.Entities;
using DataManagement.Repository;
using DataManagement.Repository.Interfaces;
using System;
using System.Collections.Generic;
using System.Data;
using System.Linq;

namespace EmpManagement.Repository
{
    public  class EmpRepository<T> : BaseRepository, IEmpRepository<Emp>
    {
        public void AddEmp(Emp objEmp)
        {
            try
            {
                DynamicParameters parameters = new DynamicParameters();
                con.Open();
                parameters.Add("EmpName", objEmp.EmpName);
                parameters.Add("EmpAddress", objEmp.EmpAddress);
                parameters.Add("EmailId", objEmp.EmailId);
                parameters.Add("MobileNum", objEmp.MobileNum);
                SqlMapper.Execute(con, "AddEmp", param: parameters, commandType: CommandType.StoredProcedure);

                //For implementing commandtimeout and transaction
                // SqlMapper.Execute(con, "AddEmp", param: parameters, transaction:null, commandTimeout: 100, commandType: CommandType.StoredProcedure);
                // Other approach to excecute Storeprocedure in dapper
                // con.Execute("AddEmp", parameters, null, null, commandType: CommandType.StoredProcedure);

            }
            catch (Exception ex)
            {

                throw ex;
            }
        }

        public void DeleteEmp(int Id)
        {
            try
            {
                DynamicParameters parameters = new DynamicParameters();
                parameters.Add("Id", Id);
                SqlMapper.Execute(con, "DeleteEmp", param: parameters, commandType: CommandType.StoredProcedure);
            }
            catch (Exception)
            {

                throw;
            }
        }

        public IEnumerable<Emp> GetAllEmp()
        {
            try
            {
                return SqlMapper.Query<Emp>(con, "GetAllEmps", commandType: CommandType.StoredProcedure);
            }
            catch (Exception)
            {

                throw;
            }
        }

        public Emp GetEmpById(int Id)
        {
            try
            {
                DynamicParameters parameters = new DynamicParameters();
                parameters.Add("Id", Id);
                return SqlMapper.Query<Emp>(con, "GetEmpById", parameters, commandType: CommandType.StoredProcedure).FirstOrDefault();
            }
            catch (Exception)
            {
                throw;
            }
        }

        public void UpdateEmp(Emp objEmp)
        {
            try
            {
                DynamicParameters parameters = new DynamicParameters();
                con.Open();
                parameters.Add("EmpName", objEmp.EmpName);
                parameters.Add("EmpAddress", objEmp.EmpAddress);
                parameters.Add("EmailId", objEmp.EmailId);
                parameters.Add("MobileNum", objEmp.MobileNum);
                parameters.Add("Id", objEmp.Id);
                SqlMapper.Execute(con, "UpdateEmp", param: parameters, commandType: CommandType.StoredProcedure);
            }
            catch (Exception)
            {

                throw;
            }

        }
    }
}

Step 10 :Create the Emp Controller in WebApi Layer as given below

using DataManagement.Entities;
using DataManagement.Repository.Interfaces;
using Microsoft.AspNetCore.Mvc;
using System.Collections.Generic;

namespace Dapper_Demo.Controllers
{
    [Route("api/[controller]")]
    [ApiController]
    public class EmpController : ControllerBase
    {
      
        IEmpRepository<Emp> _empRepository;
        public EmpController(IEmpRepository<Emp> empRepository)

        {
            _empRepository = empRepository;
        }

        // GET: api/Emp
        [HttpGet]
        public IEnumerable<Emp> Get()
        {
            return _empRepository.GetAllEmp();
        }

        // GET: api/Emp/5
        [HttpGet("{id}", Name = "Get")]
        public Emp Get(int id)
        {
            return _empRepository.GetEmpById(id);
        }

        // POST: api/Emp
        [HttpPost]
        public void Post([FromBody] Emp emp)
        {
            _empRepository.AddEmp(emp);
        }

        // PUT: api/Emp/5
        [HttpPut("{id}")]
        public void Put(int id, [FromBody] Emp emp)
        {
            _empRepository.UpdateEmp(emp);
        }

        // DELETE: api/ApiWithActions/5
        [HttpDelete("{id}")]
        public void Delete(int id)
        {
            _empRepository.DeleteEmp(id);
        }
    }
}

Step 11: Register the interface in Startup.cs file like this

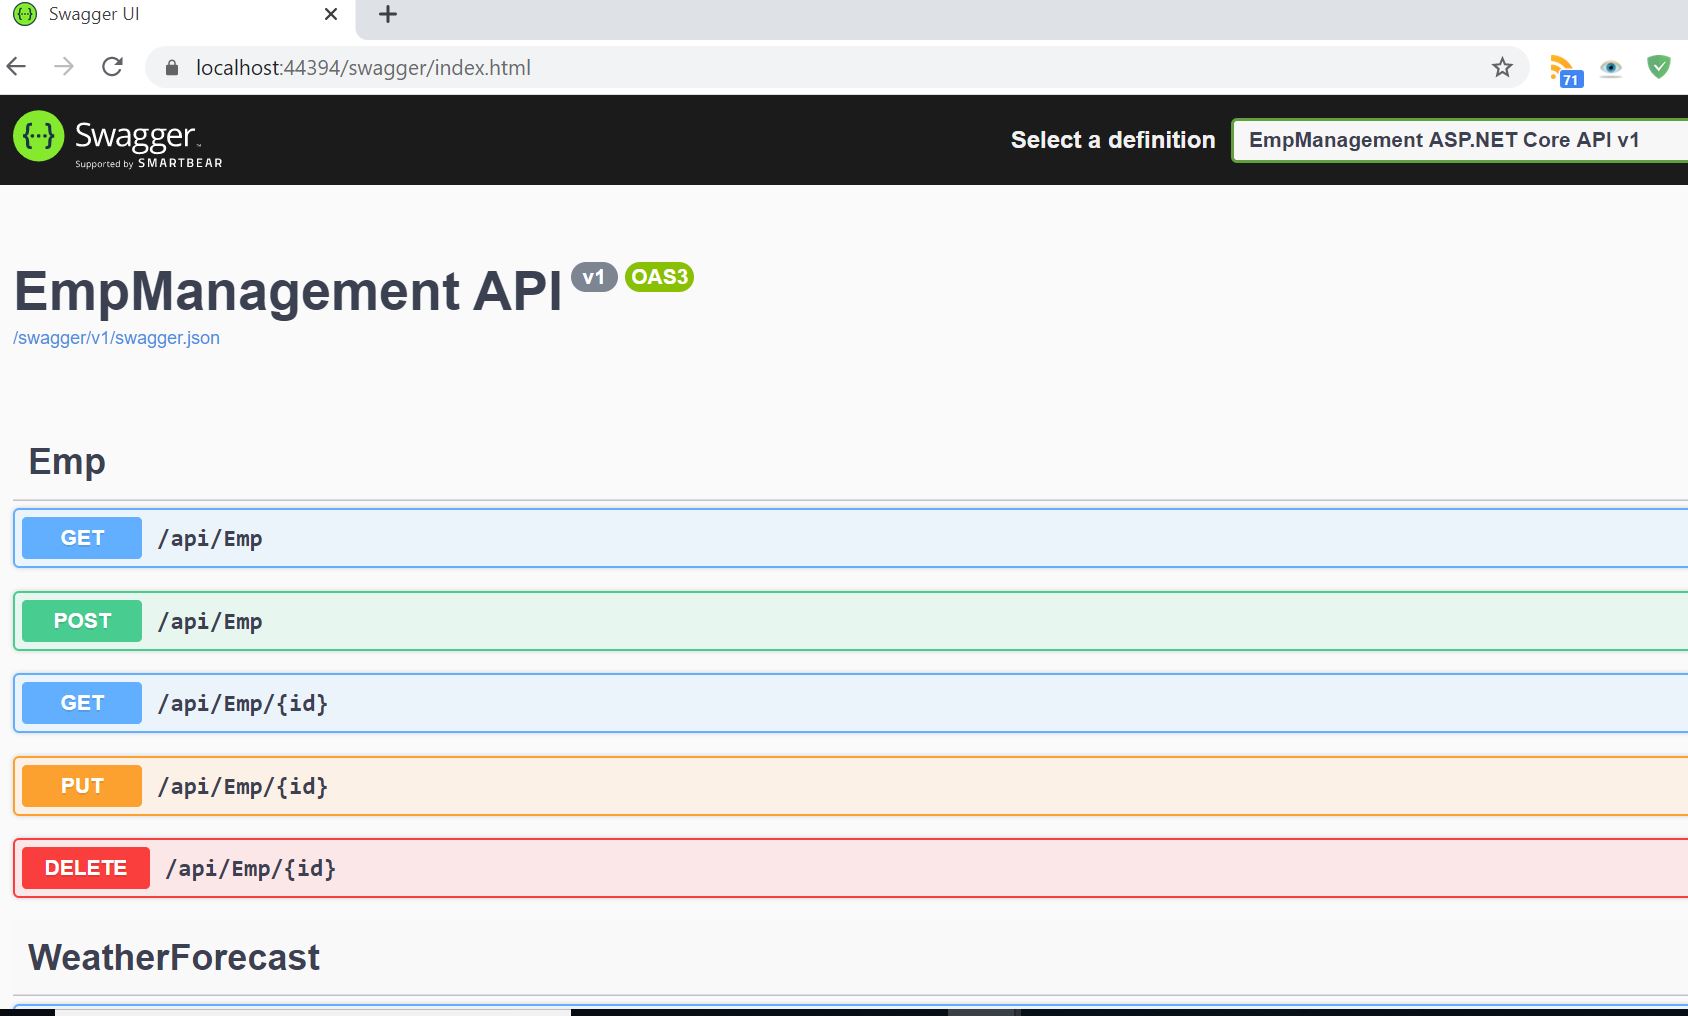
Step 12: Now run the application you will see the output like this

Summary:

In this post we learnt that how to create the web api core standalone layer using dapper and .net standard 2.0.
You can download the working code from this github repo

Source code download from github

Creating Web API in Asp.net Core 3.0 using Code First Approach and In-Memory Database


In code first approach firstly we will write the Model and Context class then Framework will create database and required code for us.

In this demo, I m using Asp.net core 3.0 web api and In-memory database for just testing the web api concept.

Step 1 : Create the asp.net core web api project like this

Step 2: In Solution Explorer, right-click the project. Select Add > New Folder. Name the folder Models and Add the class Emp


namespace EmpApiDemo.Models
{
    public class Emp
    {
        public long Id { get; set; }
        public string Name { get; set; }
        public string Address { get; set; }
        public string EmailId { get; set; }
    }
}

Step 3:: Add the following package from Nuget for EF code first and In-Memory Database like this

In the above package Microsoft.EntityFrameworkCore.SqlServer is used for doing database operation with Sqlserver.

Microsoft.EntityFrameworkCore.InMemory: is used for creating the sql database In-Memory. This is generally useful while creating the demo for POC.

Step 4: In same model folder add the EmpContext.cs file and write the code like this

using Microsoft.EntityFrameworkCore;

namespace EmpApiDemo.Models
{
    public class EmpContext : DbContext
    {
        public EmpContext(DbContextOptions<EmpContext> options)
            : base(options)
        {
        }

        public DbSet<Emp> Emps { get; set; }
    }
}

Step 5: Register the database context in Startup.cs file like this

Step 6: Create the Web Api Controller i.e. EmpsController using Scaffold like this

Now this will auto generate the CRUD operation web api code for us like this

using EmpApiDemo.Models;
using Microsoft.AspNetCore.Mvc;
using Microsoft.EntityFrameworkCore;
using System.Collections.Generic;
using System.Linq;
using System.Threading.Tasks;

namespace EmpApiDemo.Controllers
{
    [Route("api/[controller]")]
    [ApiController]
    public class EmpsController : ControllerBase
    {
        private readonly EmpContext _context;

        public EmpsController(EmpContext context)
        {
            _context = context;
        }

        // GET: api/Emps
        [HttpGet]
        public async Task<ActionResult<IEnumerable<Emp>>> GetEmps()
        {
            return await _context.Emps.ToListAsync();
        }

        // GET: api/Emps/5
        [HttpGet("{id}")]
        public async Task<ActionResult<Emp>> GetEmp(long id)
        {
            var emp = await _context.Emps.FindAsync(id);

            if (emp == null)
            {
                return NotFound();
            }

            return emp;
        }

        // PUT: api/Emps/5
        // To protect from overposting attacks, please enable the specific properties you want to bind to, for
        // more details see https://aka.ms/RazorPagesCRUD.
        [HttpPut("{id}")]
        public async Task<IActionResult> PutEmp(long id, Emp emp)
        {
            if (id != emp.Id)
            {
                return BadRequest();
            }

            _context.Entry(emp).State = EntityState.Modified;

            try
            {
                await _context.SaveChangesAsync();
            }
            catch (DbUpdateConcurrencyException)
            {
                if (!EmpExists(id))
                {
                    return NotFound();
                }
                else
                {
                    throw;
                }
            }

            return NoContent();
        }

        // POST: api/Emps
        // To protect from overposting attacks, please enable the specific properties you want to bind to, for
        // more details see https://aka.ms/RazorPagesCRUD.
        [HttpPost]
        public async Task<ActionResult<Emp>> PostEmp(Emp emp)
        {
            _context.Emps.Add(emp);
            await _context.SaveChangesAsync();

            return CreatedAtAction("GetEmp", new { id = emp.Id }, emp);
        }

        // DELETE: api/Emps/5
        [HttpDelete("{id}")]
        public async Task<ActionResult<Emp>> DeleteEmp(long id)
        {
            var emp = await _context.Emps.FindAsync(id);
            if (emp == null)
            {
                return NotFound();
            }

            _context.Emps.Remove(emp);
            await _context.SaveChangesAsync();

            return emp;
        }

        private bool EmpExists(long id)
        {
            return _context.Emps.Any(e => e.Id == id);
        }
    }
}

Step 7: Now run the application and test on post man like this

For Saving record

For Updating Record

For Deleting Record

For Fetching the Record

In this demo we saw that how to create the Web API CRUD operation using database first approach. We also saw that how to use In-memory database for creating the demo application with sql server.